Hey! Im kenzie21299 the new writer for the stard0ll secrets blog. I am super excited to be here and to be able to show you guys how to make your suites look not only architecturally amazing but decor amazing while only spending a few hundred sc. This will be a weekly section on stard0ll secrets.
Today we will be learning the architectural part of the suite room.
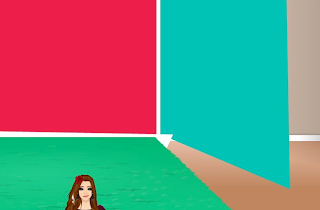
When we are done it should look like this...
I wanted to create a fun, playful room using colors I dont normally use but absolutely adore! Of course you can use whatever colors you want depending on the furniture or panels you already have available.
To begin you will need:
- 4 orange panels (or the wall that is to the right)
- 2 blue panels (the connecter/slanted wall)
- 2 pink panels (the wall on the left)
- 7 white panels (or the floor molding)
- 3 green basic rugs
- 4 orange panels (or the wall that is to the right)
- 2 blue panels (the connecter/slanted wall)
- 2 pink panels (the wall on the left)
- 7 white panels (or the floor molding)
- 3 green basic rugs
Again, you can use whatever colors you like! The panels are on the 3rd page of the stardesign and cost 7 sc (I thought it was a glitch but it looks like its gonna stay around!) so in total this room cost 300 sc (mainly because of the rugs. you can buy a white rug from villa for 50 sc, 15 sc cheaper!) You can also cut costs by not using any white molding but i would not suggest i*... *** just 7sc for each one so why not?
To start your room set it to a color. Do not leave it white!! when it is white it gets hard to see where you have white panels and where you dont. The shadowing is different for the room making the white of the paneling look different from the wall panels. step 1
Take the pink panel and put it on the far left of the room. about half way across. it looks awkward now but will look better after we add the blue and orange parts.
step 2
Add a white panel underneath the pink panel on the right. I also added the second pink panel to make it a straight edge on the right side. underneath the pink panels (to the right) add a white panel underneath. Then add the white one to the bottom. this will be the molding once we add the rugs.
Step 3
Here I have added the rug to the bottom, try to make the molding about the same size (i know it doesn't look like it is here but the camera was acting funky so it made it look smaller and at a weird angle.)
Step 4
Add a white panel over the blue panel, this will help make the molding. For the blue panel make sure the longest part is facing toward the right of your screen!
Step 5
Put the orange panel over the white one, again trying to make it the same width as the other ones!
Step 6
Add the second orange panel. make sure the edge of the orange panel is the same as the blue one:)
Step 7
Fill in the rest of the open space with white panels!
Step 8
Put the second rug next to the first one (on the right ) leaving room for the molding.
Step 9
Add the last rug, making it parallel to the blue part. ( I know it doesnt look it here b/c the camera was acting weird!)
Hope you have enjoyed learning how to do this! If you need any help just contact me through my guestbook, or if your a friend through doll mail! Plz no negative comments! Constructive criticism is great and good comments make my day! Join us next week as I show you how to decorate this room!


12 comments:
this is really cool!
Thanks so much! I am glad you like it! If you make one plz send me a photo through my sd account! thx! -kenzie21299:)
Great article Kenzie! I'll add this blog to my favorites so I can see your weekly articles! I can't wait to read more! (:
- Elena -
Great article, I like how much detail you put!!
Wow, this is really cool, I can't wait to see how you decorate it :D
Great first article Kenzie! I'm so glad you've joined the team! xo - applemartini
thanks elena! -kenzie21299
thanks a bunch! glad you liked it! -kenzie21299
thanks! me neither lol! -kenzie21299
thanks! me too! i can't wait to see what you have planned for this blog!! -kenzie21299
Ahhhhh THIS is what I need! Thankies!
thay u very much !!
Post a Comment